Making PlayStation 1 Modchips

When I was young I owned a PlayStation 1 (PS1). It was one of the first, if not the first, game consoles I owned and it had a profound effect on my future.
I can trace the history of how I got involved in computers back to playing and modding video games. While I wasn't smart enough to mod game consoles when I was young, my dad wasn't bad at it. He modded my PS1 to have a little switch in the back that would allow it to play burnt games. They say the apple doesn't fall far from the tree.
Fast-forward to today and I no longer have my original PS1. I remember some games wouldn't load anymore and I had gotten a PS2. So why keep an old console? Turns out the answer is nostalgia and memories. You miss what you don't have anymore.
Recently a friend gifted me a PS1. And so then the journey begins, how do I mod this thing?
If you are looking for them I am selling flashed, prewired modchips.
Playstation 1 DRM
Very simply, the principles behind PS1 DRM work as follows:
- Sony baked (not the technical term) strings (i.e.
SCEA,SCEI,SCEE, or in rare casesSCEW) into official PS1 games in locations which cannot be replicated by a regular reader. This video and this post discuss it reasonably well. - The CD drive controller looks for those strings to identify a disc as official. Once the controller decides that the disc is/isn't official, the main CPU reads this decision and acts accordingly.
- If the string can't be found or is garbled, the PS1 knows the disc isn't an authentic PS1 game. However, because the PS1 needs to account for disc read errors, there's a good amount of leeway in what passes the authenticity check.
- Because region (A for America, I for Japan, E for Europe, and W for Net Yaroze) as well as authenticity are rolled into one string, Sony kills two birds with one stone here and achieves region locking as well as copy protection.
If you want a real in-depth discussion you can read the original posts by The Old Crow or the No$PSX documentation page or this Modchip FAQ
PSX modchips work by electrically stifling the output originally generated by whatever CD is inside the drive and then injecting a new, faked signal into the CD microcontroller. This causes the PS1 to believe that whatever disc is inside is legitimate and proceed to boot up.
Later on Sony added more complicated checks like:
- Checking for the magic strings during the game instead of at boot
- Changing the overall process to make it more difficult to bypass by simply emitting the correct strings.
However, modern modchips already deal with this. Modchips that work under these updated circumstances are known as "stealth modchips" because the console shouldn't be able to detect them at all.
Existing Modchips
The first "open source" modchip was reverse engineered by a guy named "The Old Crow". Surprisingly, The Old Crow specializes in electronic music synthesizers, not hacking video game consoles. It's from his modchip that most other modchips are derived from in some sense. He originally reverse engineered a commercial PS1 modchip that was designed by a western engineer working for a Chinese company.
Today, there are three main modchips which are still used by the community today.
The modchips include:
The three have their pros and cons but generally they can be summarized as follows:
-
MM3 is the most common PS1 modchip seen/used today. Its only real downside is that it uses an internal oscillator which can become out of sync with the oscillator used by the CD drive. If this happens you simply need to reboot your console to try reading again.
-
Mayumi v4 attempts to use the oscillator used by the CD drive. This reduces the chance of the oscillator sync issue from happening; however, Mayumi v4 is considered a bit difficult to install.
-
PSNee is an open source modchip originally written by TheFrietMan. Development on it was later continued by others and it appears to work rather well on all Playstation 1/PSOne models. Based on the code I believe it attempts to infer where the PS1 is in the boot process to begin injecting fake
SCEXstrings. Unfortunately PSNee is complicated to install. The provided diagrams are atrocious and nowhere near as simple as the available diagrams for MM3 and Mayumi. I worked out the pinout for the Attiny45 but I ended up going with MM3 and Mayumi because it's easier.
Making a Modchip
If you want them I am selling flashed, prewired modchips.
It's generally pretty easy to make a PS1 modchip provided you have the right tools. In this tutorial we will focus on making MM3 or Mayumi v4 modchips.
While I do have an Arduino, I prefer to use the MM3 and Mayumi chips over PSNee. If you want to make a PSNee modchip, you can follow the instructions here to flash the .ino file to your Attiny.
You will need:
- Microchip PIC12F508
- PICkit 3
- Also download and install MPLAB IPE from the MPLAB X IDE package.
- Some kind of wiring & breadboard to connect the PIC to to the PICkit.
- HEX codes for the modchip of your choice (provided below).
Many tutorials call for the PIC12C508. This is an old model and continuing to use them is unnecessary unless you have them stockpiled. HEX codes that work for the 12C will work for the 12F.
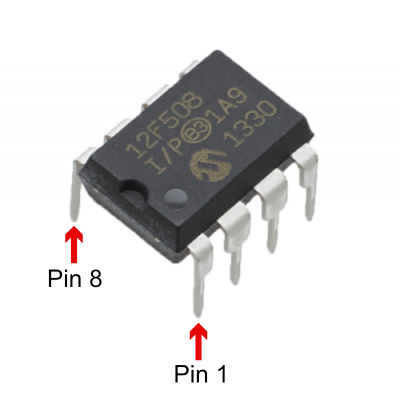
To begin you should first look your IC and determine which leg is which. The leg nearest the imprinted circle is Pin 1. The leg opposite it is Pin 8.
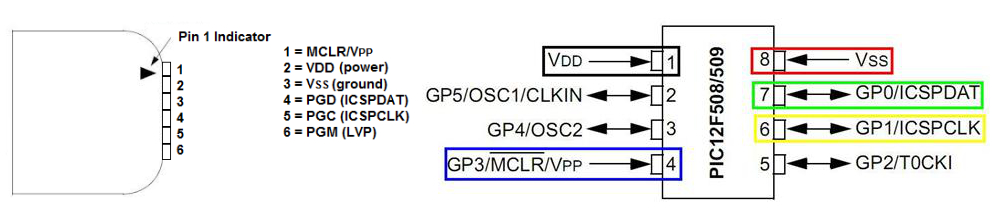
You can plug this into a bread board and then wire it into the Pickit according to the following diagrams. You want to match the following (the rest are unused for now):
- PICKit 1 ⟷ IC 4 (VPP)
- PICKit 2 ⟷ IC 1 (VDD)
- PICKit 3 ⟷ IC 8 (VSS)
- PICKit 4 ⟷ IC 7 (ICSPDAT)
- PICKit 5 ⟷ IC 6 (ICSPCLK)
Once you've properly wired up the chip, connect the PICKit to your computer and start MPLAB IPE. Under Device select PIC12F508.
Go into Settings > Advanced Mode. The default password for Advanced Mode is microchip. I don't recommend changing it, not sure why the option is even available.
Go into the Power tab on the left and enable Power Target Circuit from Tool.
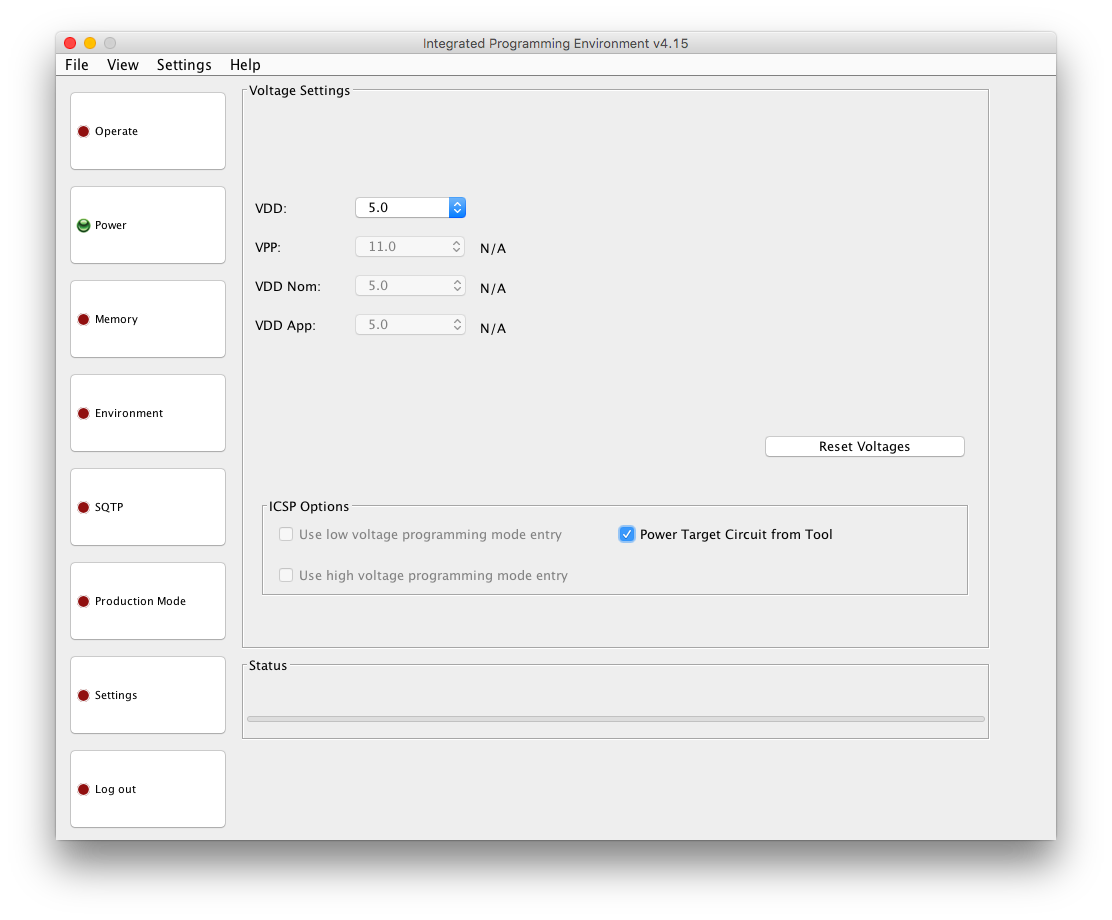
Go back to the Operate tab and hit Connect.
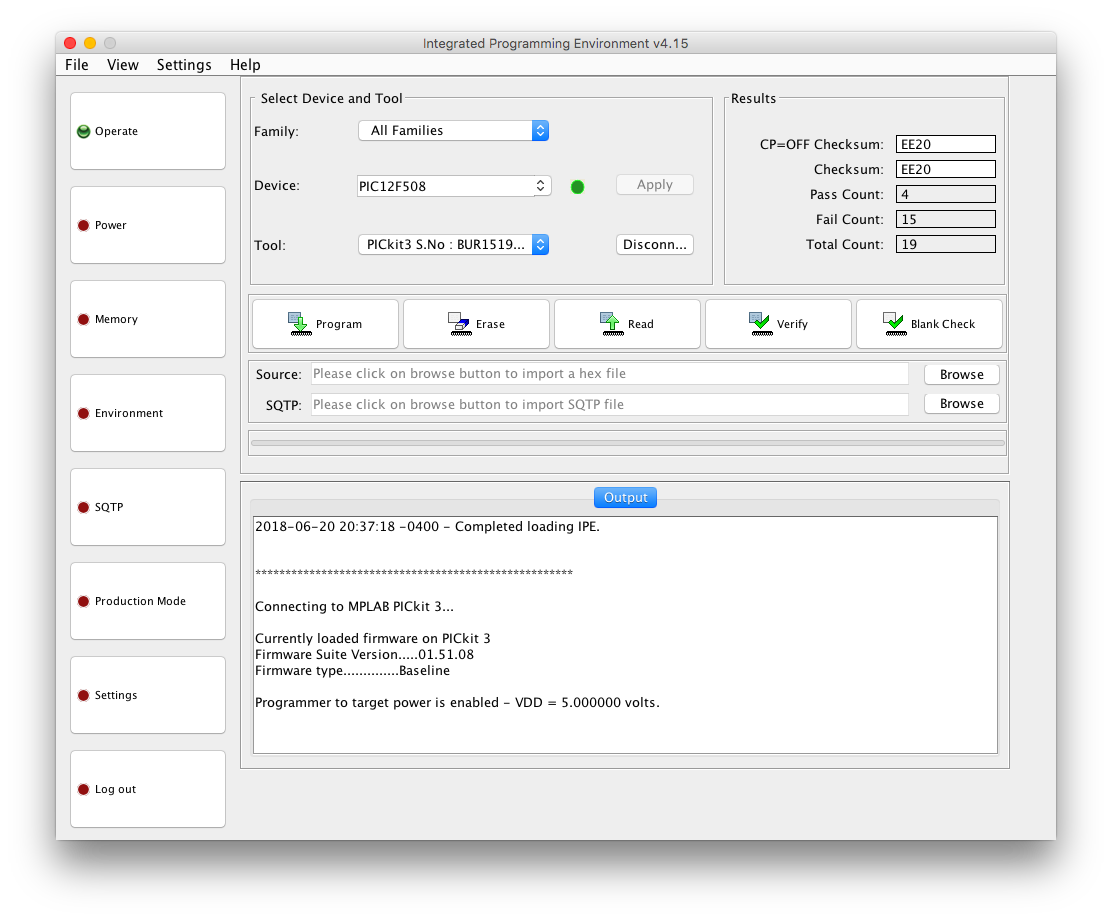
From here download the appropriate HEX code for your chip and console. They are different per console region.
You can also use Mayumi v4 on the PIC12F508 if you choose.
In the Source file, select your hex code.
Hit the big Program button.
You should see something similar to the following text:
2018-06-20 20:48:02 -0400 - Loading hex file. Please wait...
Loading code from /Users/kchung/Repositories/PsNeePy.wiki/hexcodes/mm3/MM3USA.HEX...
2018-06-20 20:48:03 -0400 - Hex file loaded successfully.

2018-06-20 20:48:20 -0400 - Programming...

Device Erased...

Programming...

The following memory area(s) will be programmed:
program memory: start address = 0x0, end address = 0x1e7
configuration memory
Programming/Verify complete
2018-06-20 20:48:25 -0400 - Programming complete
If you'd like, you can hit the Verify button to make sure that your flash was correct. Your output should look something like the following:
2018-06-20 20:50:10 -0400 - Verifying...

Verifying...

The following memory areas(s) will be verified:
program memory: start address = 0x0, end address = 0x1ff
configuration memory
User Id Memory

Verification successful.
2018-06-20 20:50:13 -0400 - Verify complete
From here you can follow online diagrams for soldering your chip to the PSX that you own. I personally used William Quade's excellent diagrams and think you should as well.
Creating A New PS1 Modchip
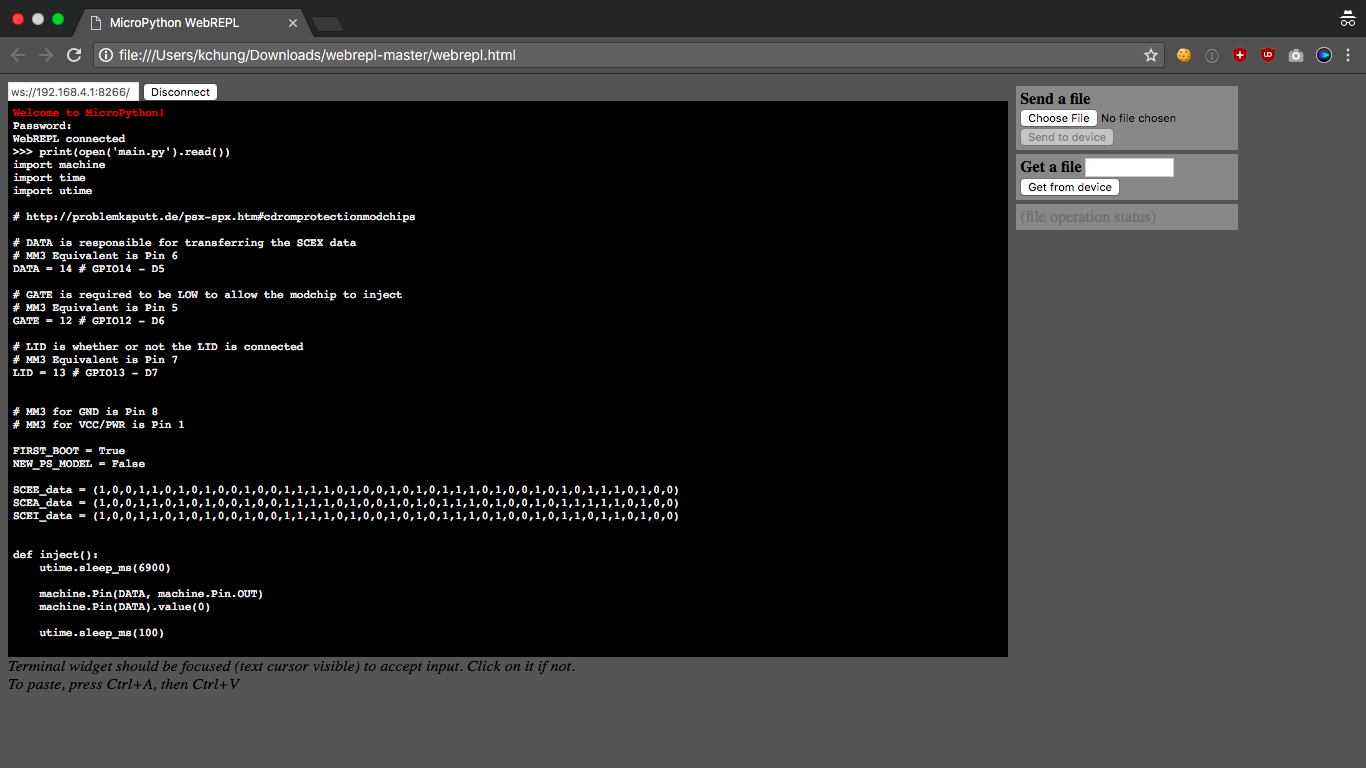
While looking at all these modchips, I figured it would be nice to read and write Python code instead of Assembly and C code so I started working on porting PSNee to Python.
By using MicroPython and an ESP8266 we can actually create a modchip that we can remotely update and modify through the ESP8266's WiFi.
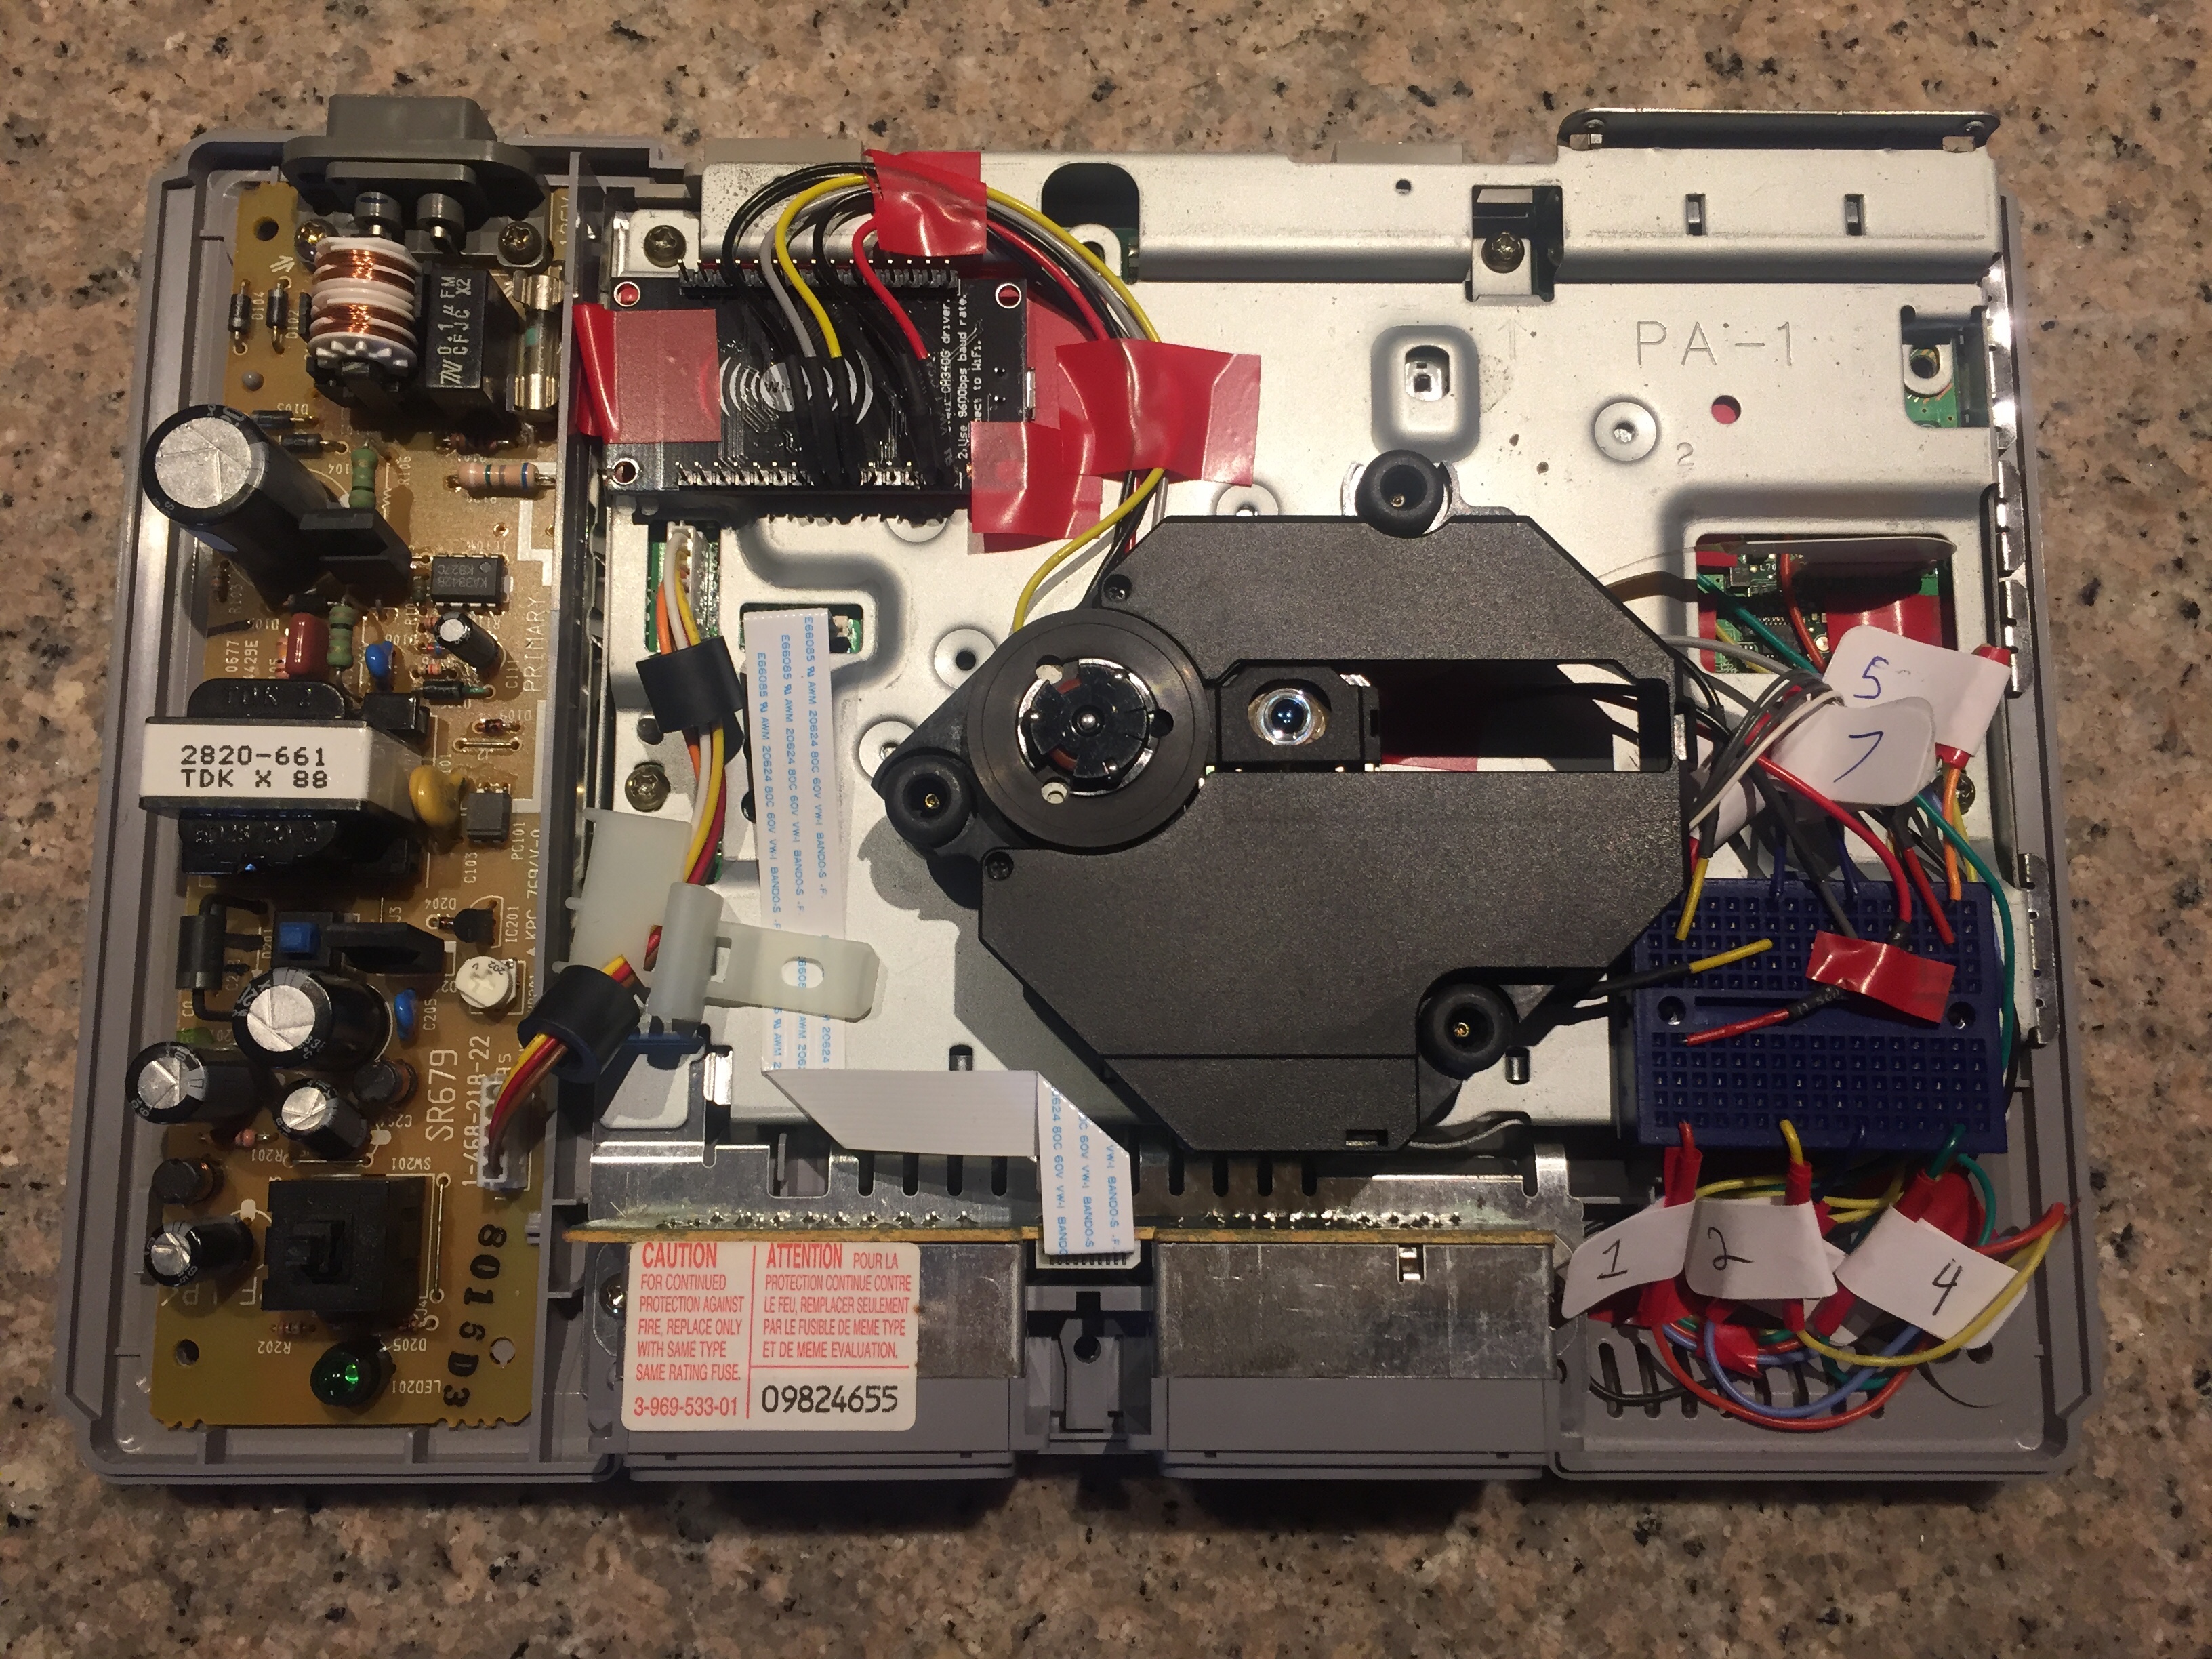
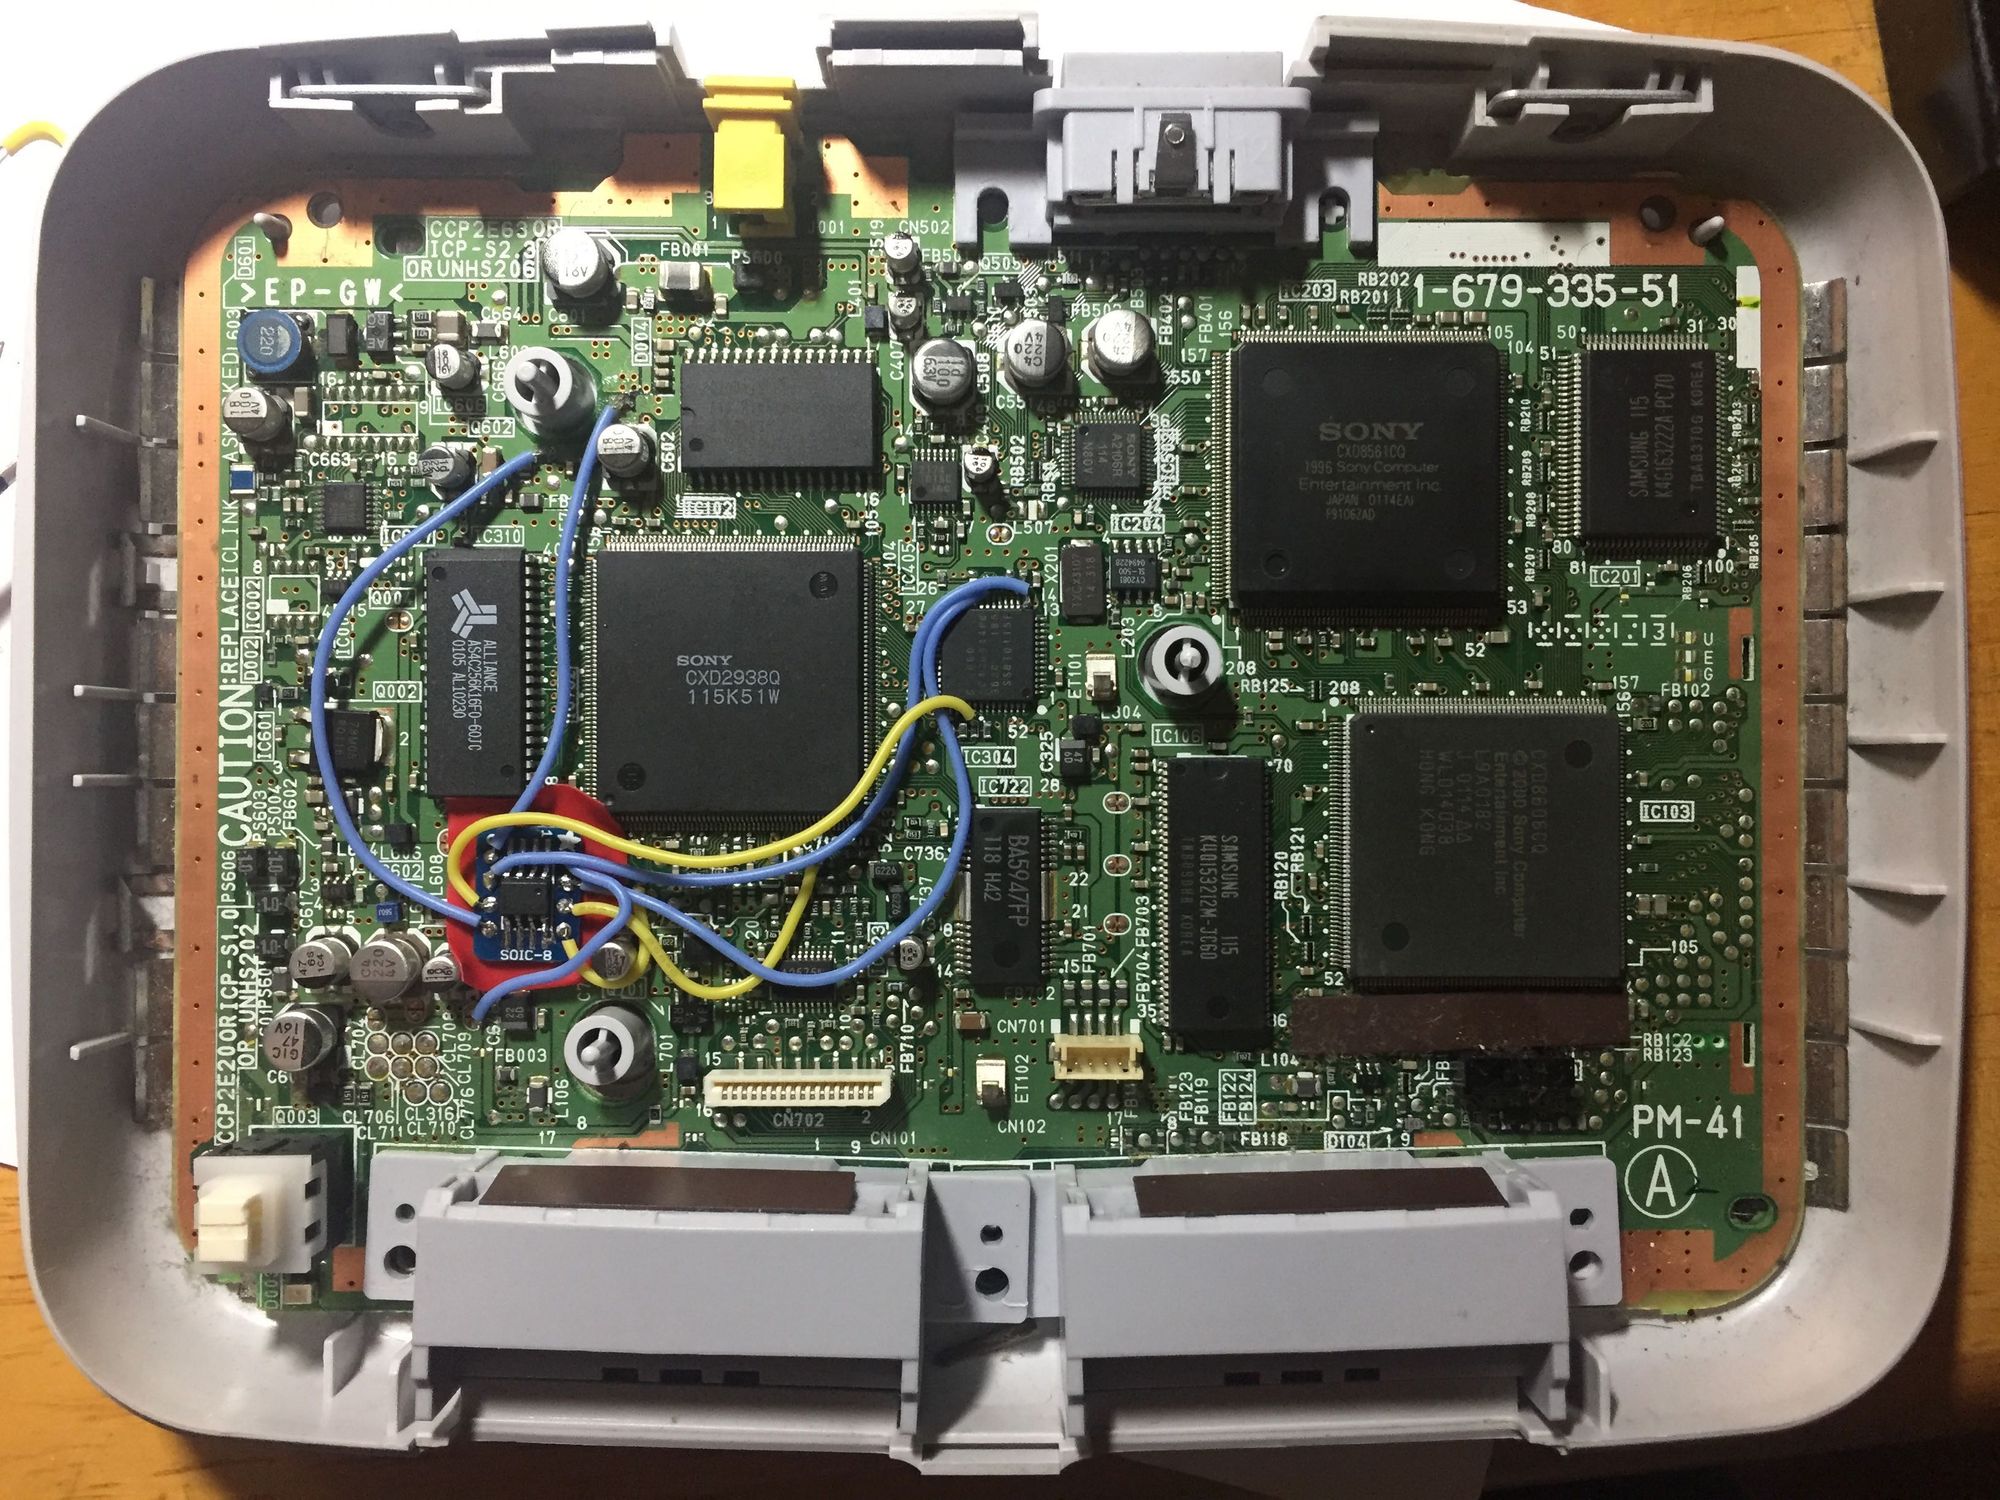
In the above photo (SCPH-7501), the ESP8266 is on the top left with the headers face up. The wires connect to the headers and route under the CD drive to a breadboard on the bottom right.
The breadboard has wires that are soldered to the correct MM3 points and then labeled with the corresponding pin number. By using this breadboard I can test modchips that I make much faster than soldering to the board over and over again.
My modchip (named PsNeePy) is available on Github:
https://github.com/ColdHeat/PsNeePy
While my test console is quite bad at reading discs and the console rarely boots into games, the modchip does work.
For the most part (ignoring stealth functionality), modchips are known to be working once you reach the black Playstation logo screen as this indicates that the CPU considers the game authentic.
However, because the code is based off an older version of PSNee, stealth functionality does not seem to work on some newer PS1 revisions.
I mostly created this as a proof of concept and I'm unlikely to maintain it very much. While I don't recommend using my modchip, I hope that the community adopts it and helps improve it. Despite being a dead console, the PSX community is fairly active.
With PsNeePy, you can remotely update the ESP8266 over WiFi, debug remotely, and also reset the chip easily. Having spent many hours working on the PS1 at this point, a more modern experience is quite refreshing.
Thanks to an anonymous friend for my PS1, Sharan for fixing my PS1, William Quade for the excellent diagrams, AssemblerGames for having good information despite not accepting me into the forum, and PSXDEV for answering some of my questions.